
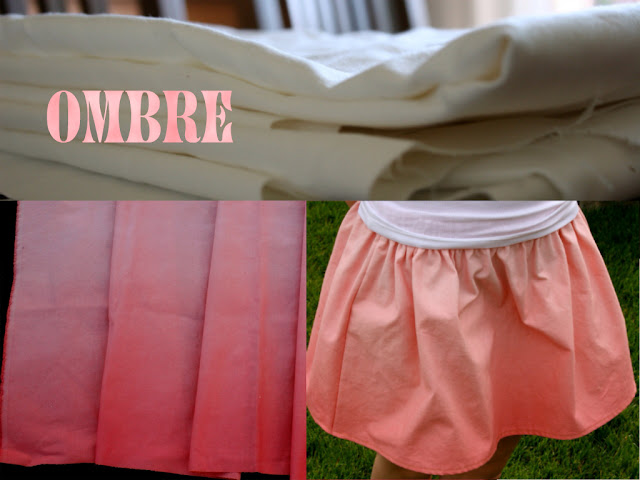
Dying Fabric, Ombre-Style
A couple of years ago, I was given the Great White Bolt of fabric. It's every crafter's dream to have quality items just handed to her. This bolt has served many purposes: bridal gifts, chair covers, table cloths, napkins, ribbons, tote bags. For all its done, though, there's been one thing lacking: color. So I added color!
Dyeing fabric is not as difficult as I thought it would be, and it is really inexpensive! About $4.00 to take a piece of white fabric and give a coral ombre makeover.
 I followed the directions found at Rit Dye's website. You can access that here. Or you can read on to have the step-by-steps for what I did to achieve the color and look I have.
Materials and Supplies
*White or light fabric (or shirt, skirt, dress, etc.), washed
*Rit dyes - I used the powder, and I mixed two to get the coral color (Fuchsia and Golden Yellow). I mixed half of the Fuchsia and a quarter of the Golden Yellow.
*Pyrex measuring cup
*Large plastic bucket for mixing the hot water and dye
*1 cup salt
*Squirt of liquid detergent (I think dishwashing liquid would work, too)
*Metal spoon
*Rubber gloves
*Tarp or whatever you use to do painting/crafts
I set up my dyeing area outside on the grass. I always use an old sheet to do painting projects, so that's what I used for this. It really isn't as messy as it appears -- just keep the animals away or you may end up with a pink cat!
Instructions
 Join in on the spring fun! Share a recipe, project, favorite photo or anything else for Spring Week!

Dyeing fabric is not as difficult as I thought it would be, and it is really inexpensive! About $4.00 to take a piece of white fabric and give a coral ombre makeover.

Materials and Supplies
*White or light fabric (or shirt, skirt, dress, etc.), washed
*Rit dyes - I used the powder, and I mixed two to get the coral color (Fuchsia and Golden Yellow). I mixed half of the Fuchsia and a quarter of the Golden Yellow.
*Pyrex measuring cup
*Large plastic bucket for mixing the hot water and dye
*1 cup salt
*Squirt of liquid detergent (I think dishwashing liquid would work, too)
*Metal spoon
*Rubber gloves
*Tarp or whatever you use to do painting/crafts
I set up my dyeing area outside on the grass. I always use an old sheet to do painting projects, so that's what I used for this. It really isn't as messy as it appears -- just keep the animals away or you may end up with a pink cat!
Instructions
- Bring 4 cups of water to simmering. (I used a tea kettle.) Add the hot water, 1 cup salt, and powder dye into the bucket. Mix well with the spoon.
- Add 2 gallons of hot tap water to the bucket and a bit of liquid detergent.
- Get your fabric wet, and then get ready to dip! My fabric was wide - about 3 yards. I was able to fold it a few times, and it still soaked up the color just fine. I also rolled it, letting out the bottom as I went. The site suggests wrapping it around a dowel, and that would work, too.

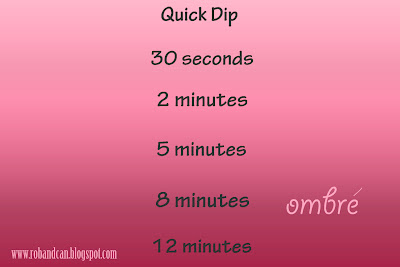
- Dip the bottom few of inches into the dye. Swish it back and forth, in and out of the dye, for around 10-12 minutes. The longer you hold it in, the darker it gets. Keep in mind that if you're trimming your fabric up for use, some of the edges will be gone! Give yourself room.
- Dip more of the fabric in and do the same for less time, around 8 minutes, rolling out the fabric as you need.
- Continue dipping the fabric in, layer by layer, until you're close to the top, lessening the amount of time as you go.
- For the lightest layer, dip it in for just a moment. It will take in a light shade.
- Once everything looks good, take out your dyed fabric, then rinse it in cold water, making sure the water runs down to the darkest layer. (I did this outside with the hose.) The final step is to rinse in warm water, so you'll have to do this inside. Rinse until the water runs clear, about 10 minutes.
- Wash your fabric in warm water with detergent. I did this in the sink, so it gave me more time to make sure the dye was all rinsed out. My white sink rinsed out just fine with a little Barkeeper's Friend.
- Dry your fabric, and you're set! I'd recommend washing it by itself the first time or two, but then it should be good to go!

how fun!!!! i LOVE the color - neat trick for getting coral out of fuschia and yellow :)
ReplyDeleteThanks, Marisa! Perhaps once you're all settled again, you could give this a try...that is if you can keep Kiah away from the dye.
Delete